Guide | MobiPOS > Online Ordering > Online Ordering General Settings
Timer Countdown (Seconds)
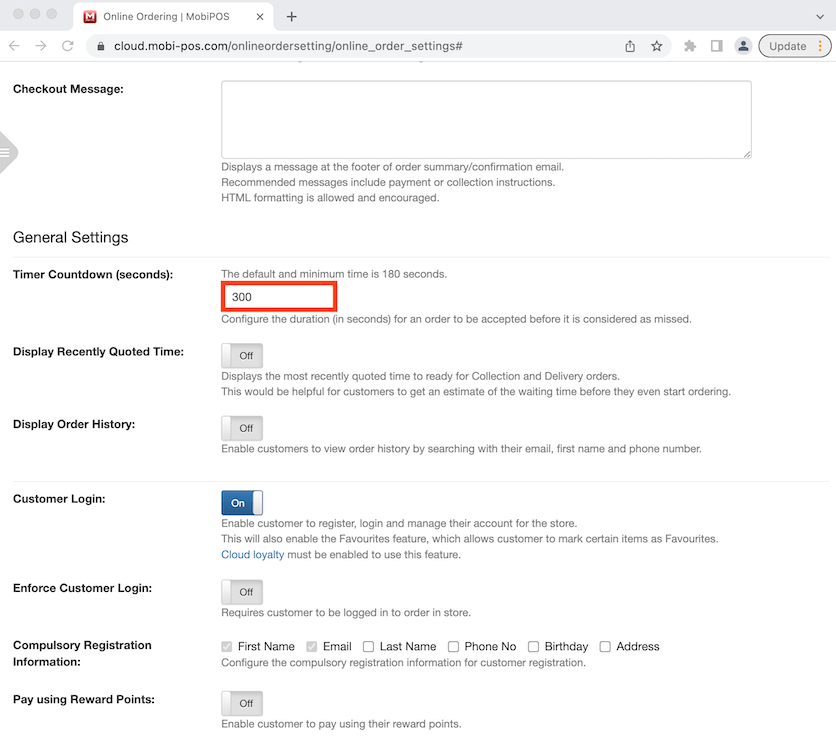
Set a timer for your business to accept or reject an incoming online order. The default time is 180 seconds which is 3 minutes. You can set a longer timer if the staff members are too busy to accept an order immediately. Orders that are not accepted will be considered missed.
The timer is configured in seconds. 300 seconds (5 minutes) is entered in the example photo. Click Save at the bottom of the page after.
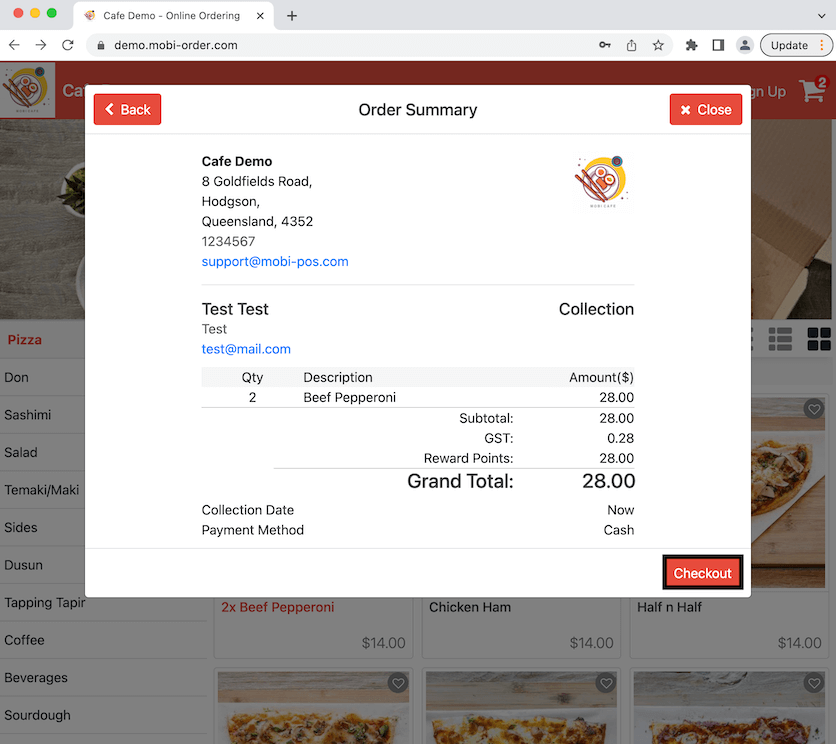
Go to the online ordering store and order the items you want to add to your cart. Click Checkout when you're done.
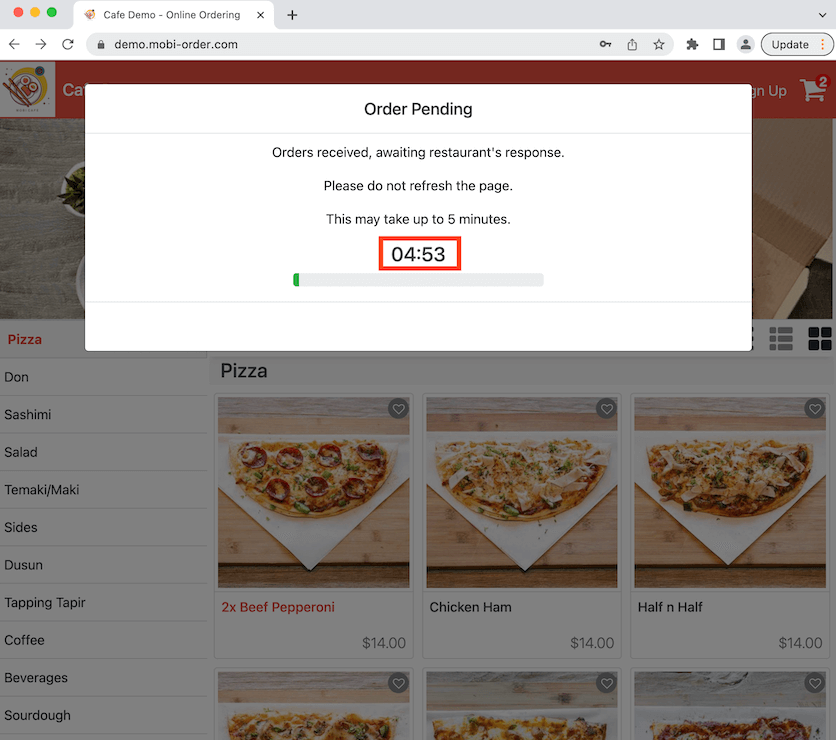
Now it shows the waiting time is 5 minutes (300 seconds) instead of the default time 180 seconds (3 minutes).
Display Recently Quoted Time
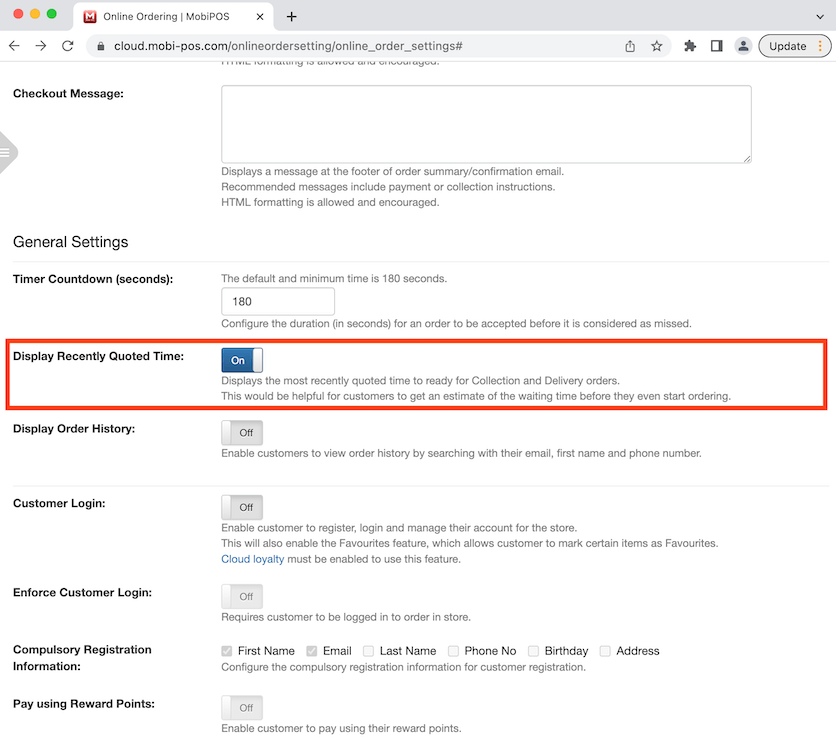
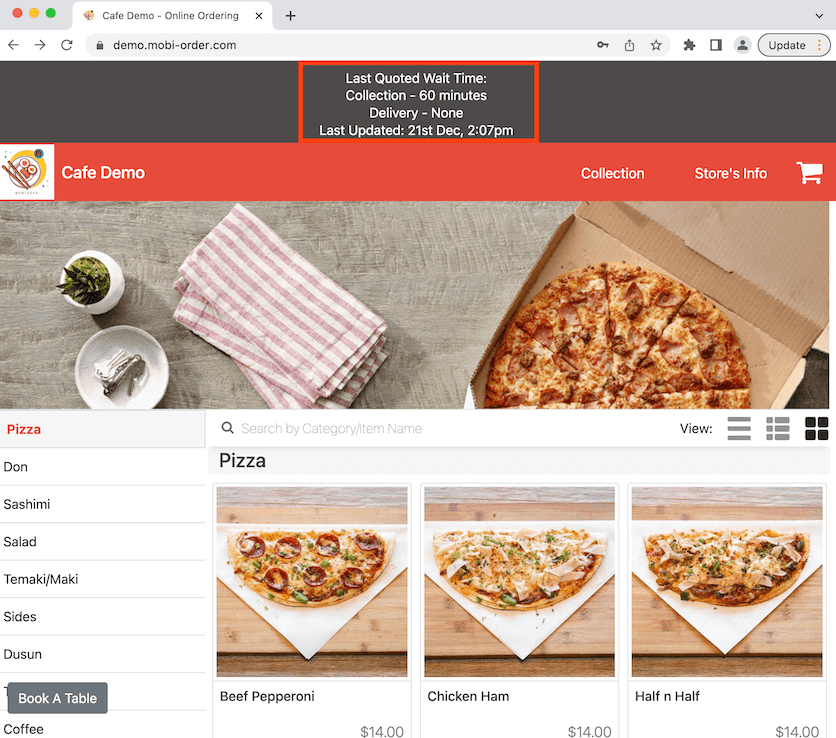
This displays the quoted time based on the most recent order for customers to estimate the waiting time for collection or delivery orders. This is avoid cancellation of orders after after payment is made.
Click to toggle on then click Save after at the bottom of the page.
Now it shows the last quoted waiting time on the header of the online store.
Display Order History
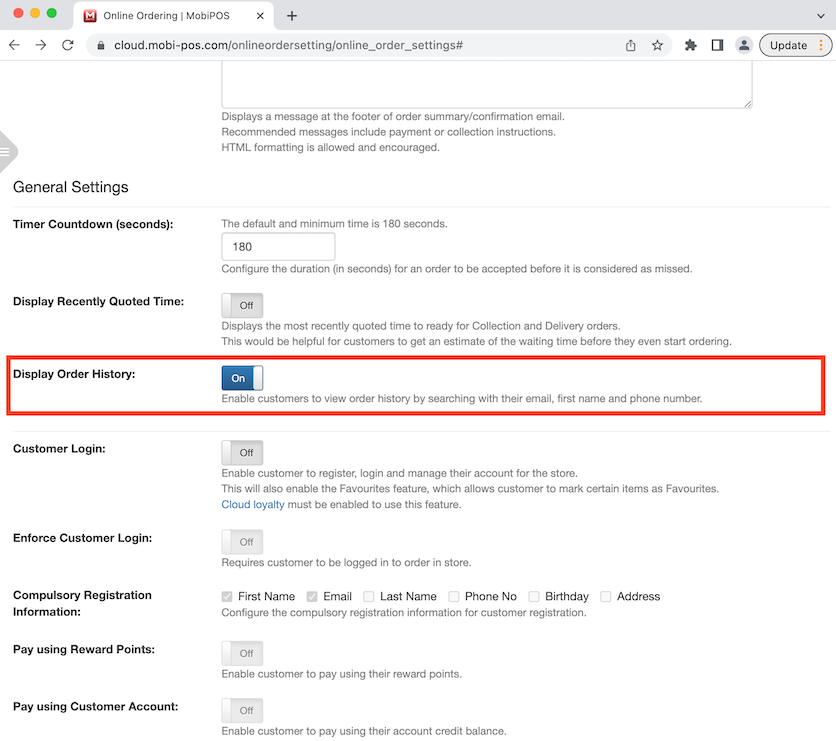
This allows customers to view their order history by searching their first name or email and their contact number but you can leave it as Off if you want to avoid customer using another person's name and contact details to look up the order history.
Click to toggle on display order history then click Save at the bottom of the page after.
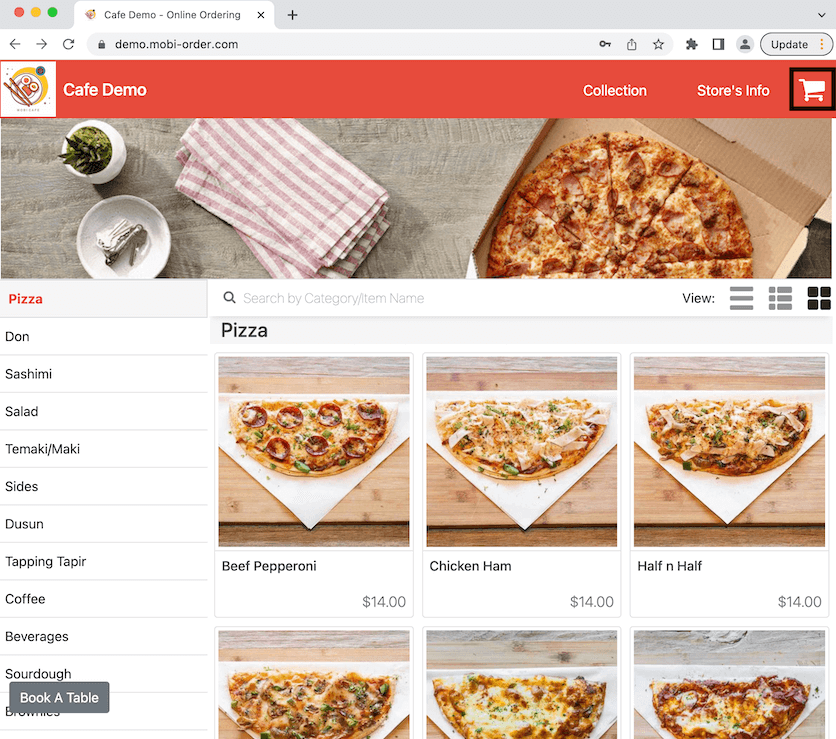
Go back to the online store and click on the Cart on the top right corner.
Click on Order History at the left bottom corner of the tab.
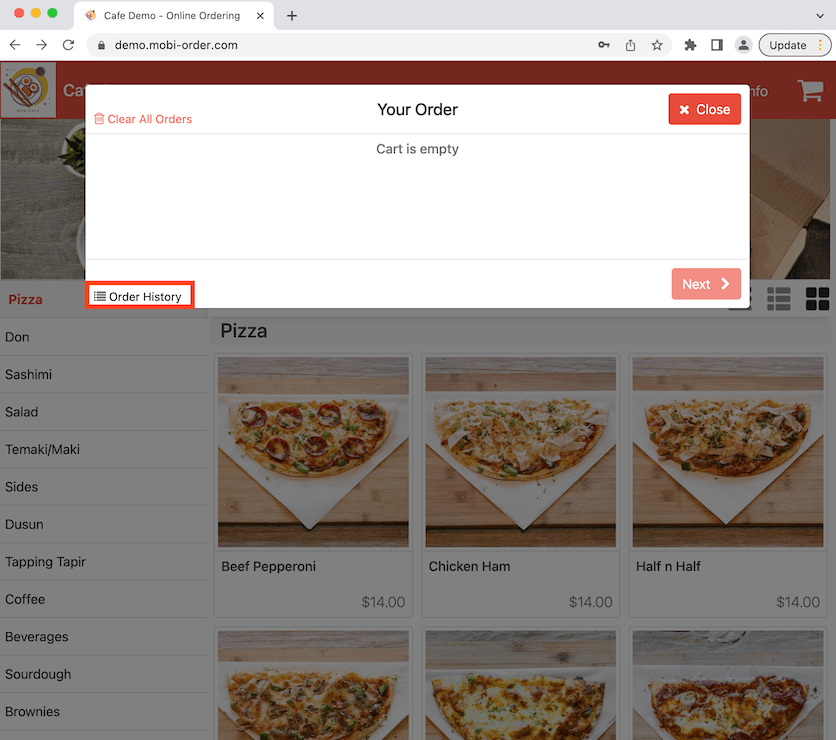
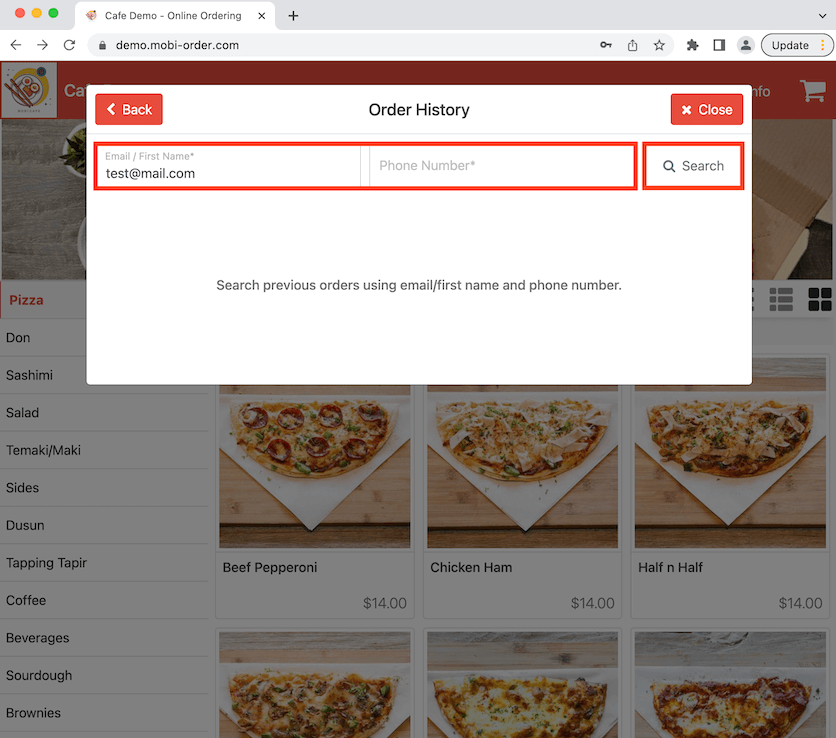
A tab will pop up and the customers can look up their previous orders by entering the email or first name and phone number. An email is entered in the example photo. Click Search after you are done.
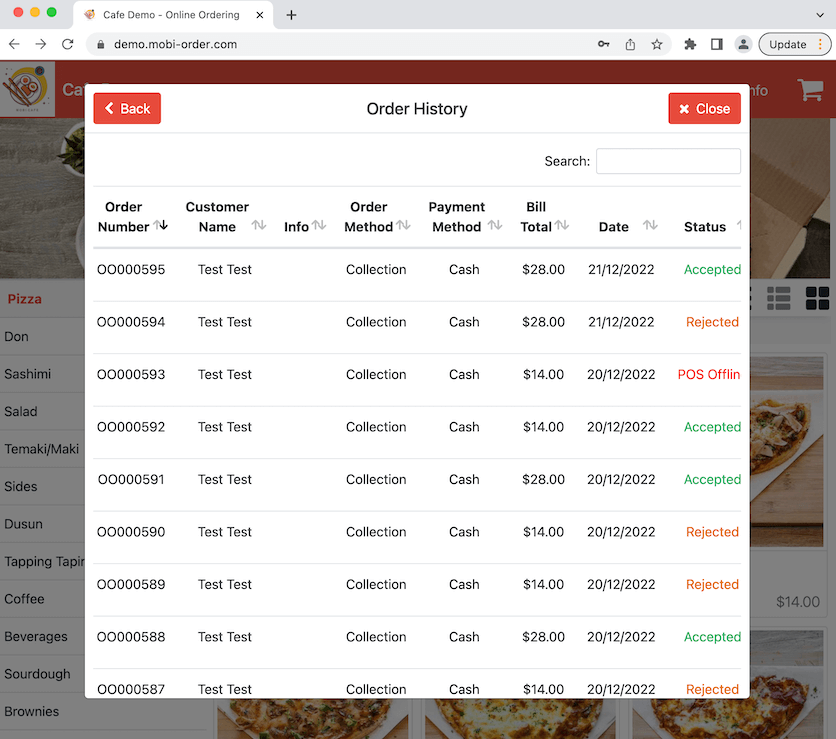
Now you can view the order history and the order details.
Customer Login
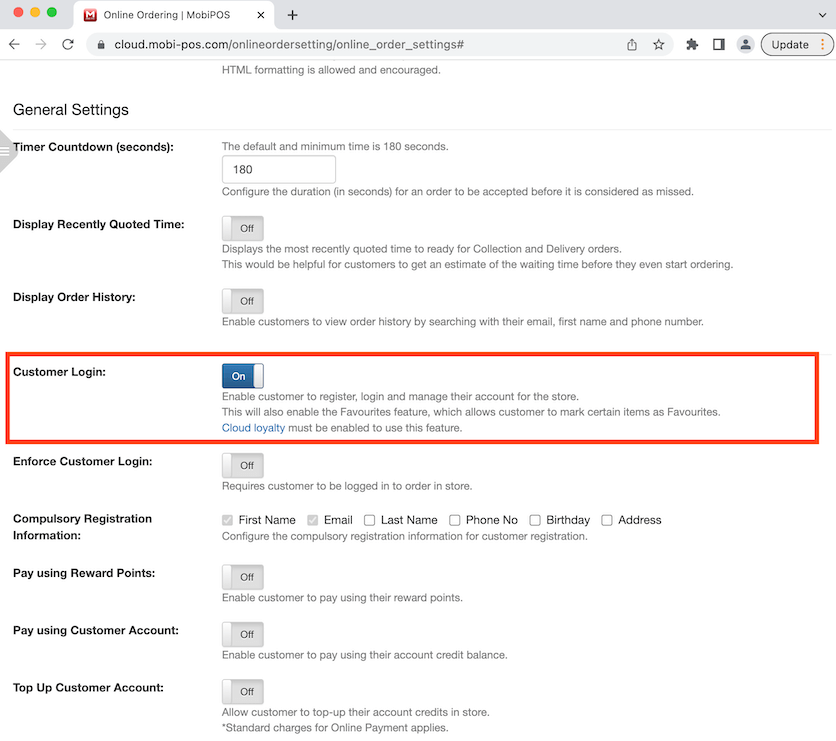
Enabling this allows customer to sign up or log into their account to manage their orders. Note, if there is an existing account in POS, it will be automatically linked to the online account via the same phone number and email. Click to toggle on then click Save at the bottom of the page after this is enabled.
Now the Log In/Sign Up button is available on the online store. Click on it to proceed.
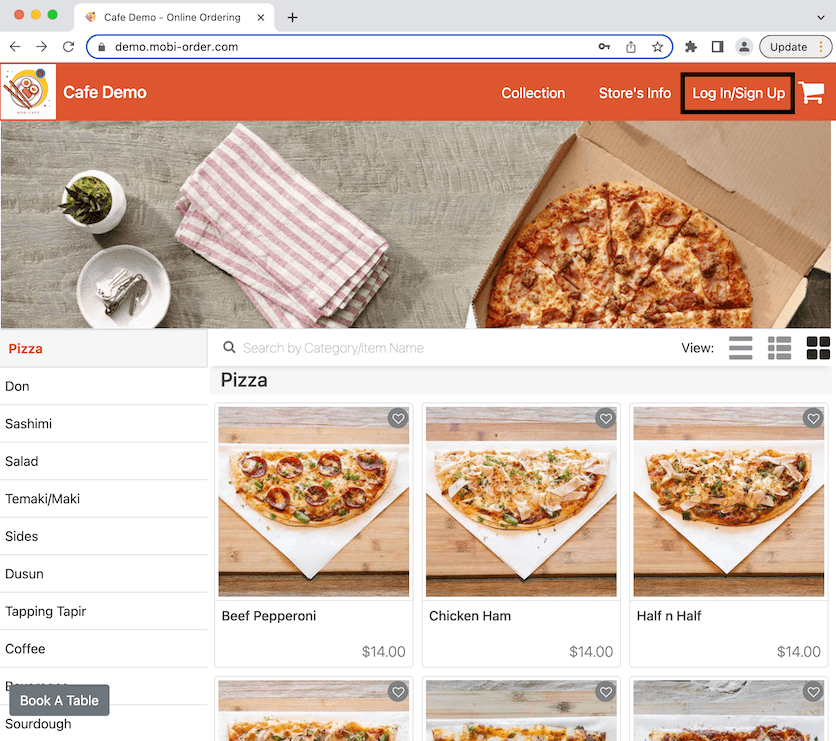
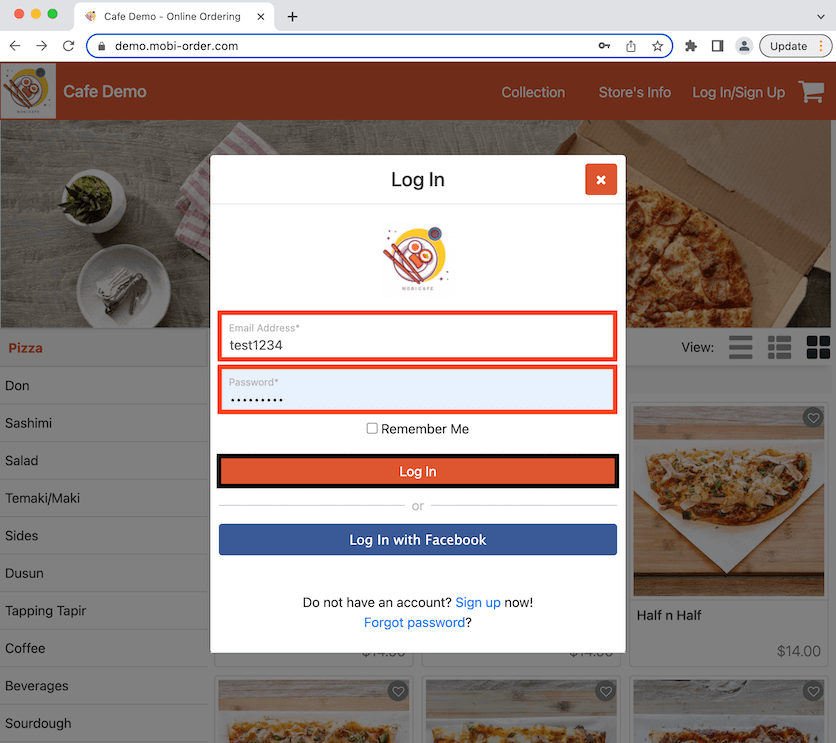
You are at the log in page now. The customer can choose to log in with their username, email address or Facebook account. In this case, an example username is entered. Click Log In to continue.
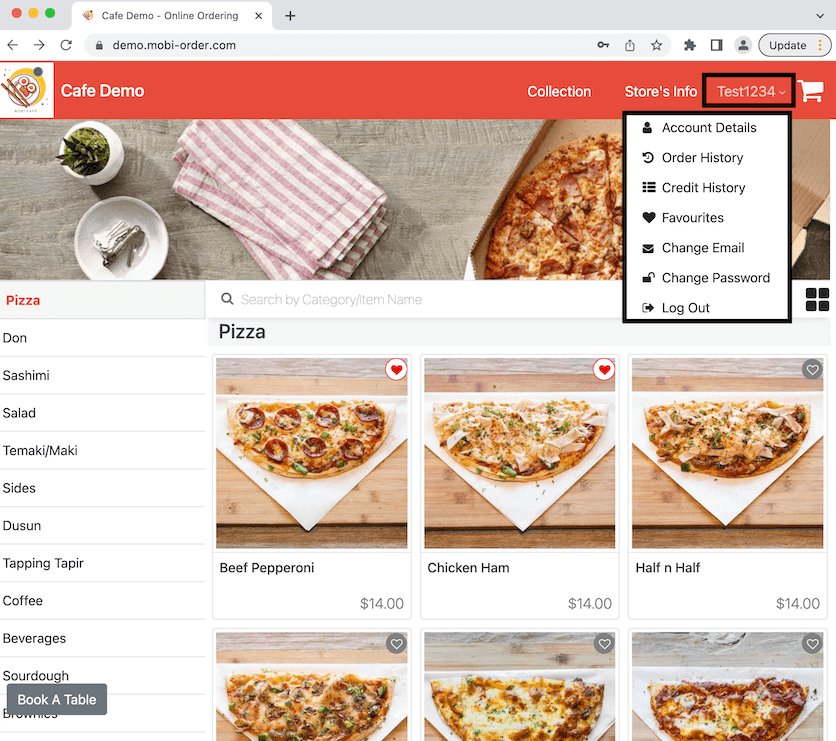
Now it shows your username at the top right corner of the page. Click on it and it will show you the options to manage your account.
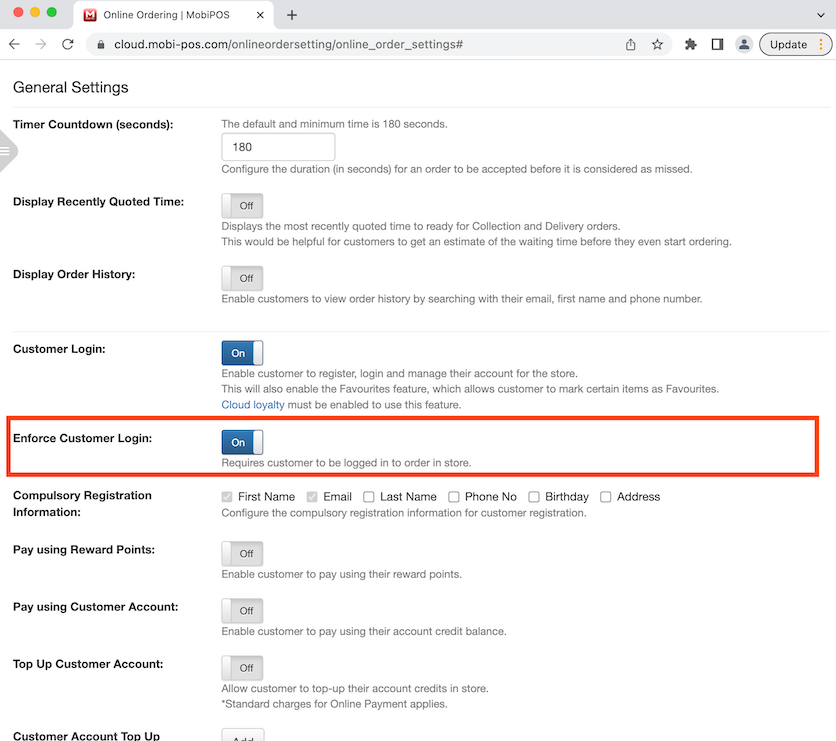
Enforced Customer Login
This requires customers to log in before they can make an order. Toggle this on and click Save on the bottom page after.
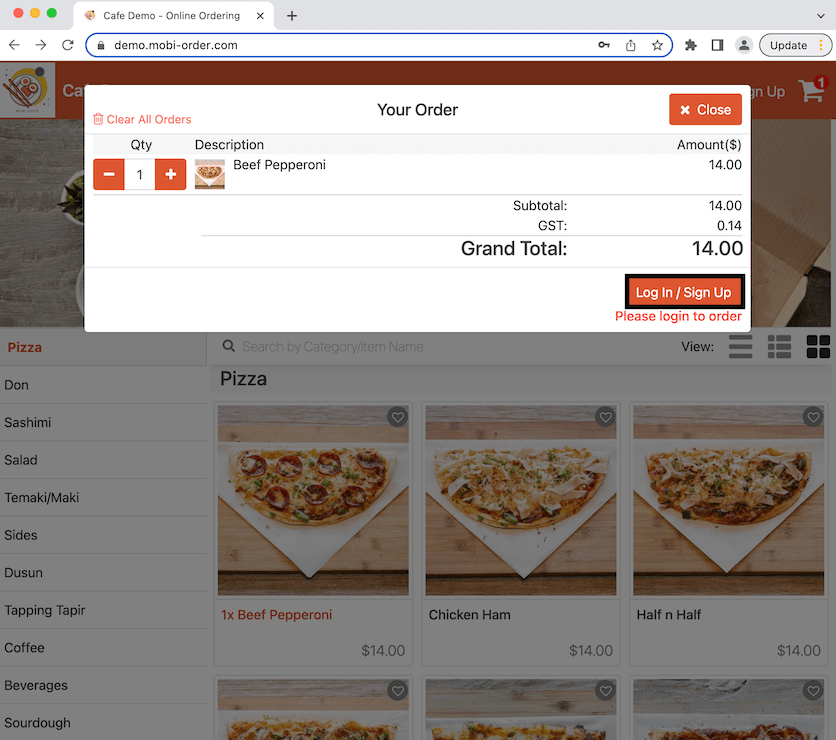
Now when the customer wants to order an item, they will be asked to log in or sign up before they proceed. Click on the Log In/Sign Up button at the bottom right corner.
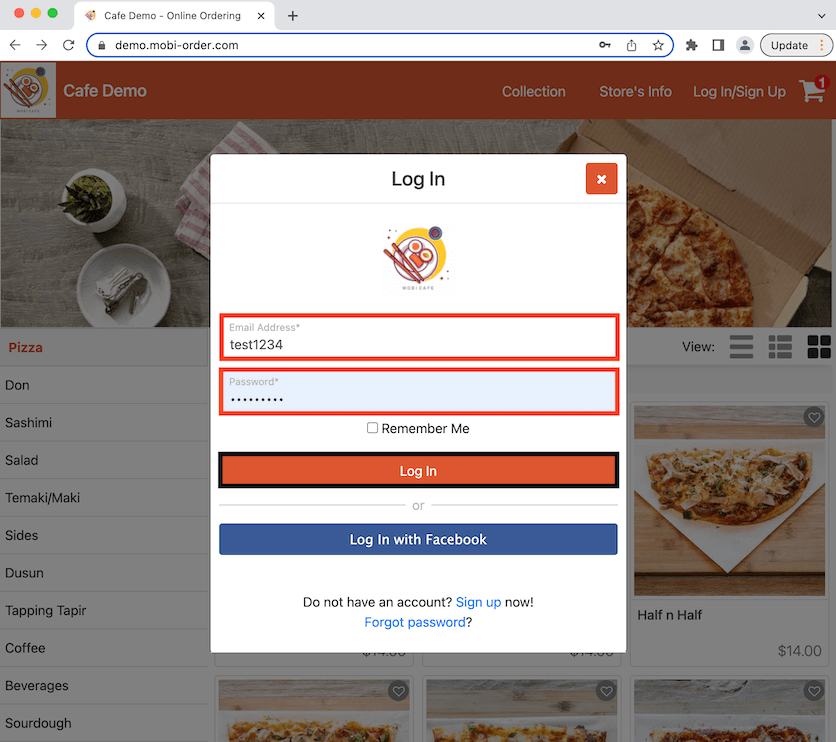
Enter your account details and click Log In.
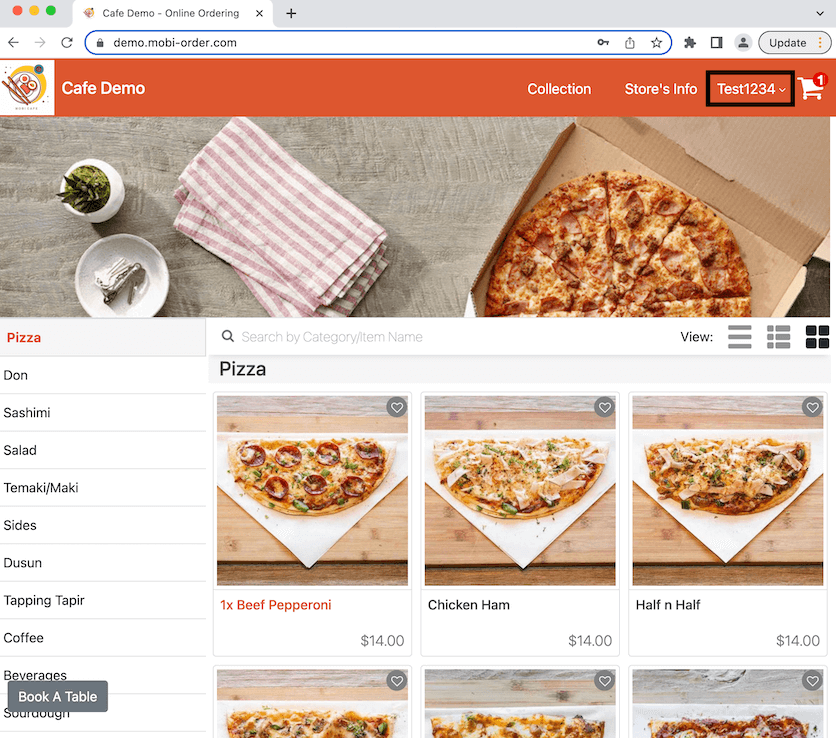
You are now logged in and the username will be shown on the top right corner. You can now proceed with the order to make the payment by clicking on the cart.
Compulsory Registration Information
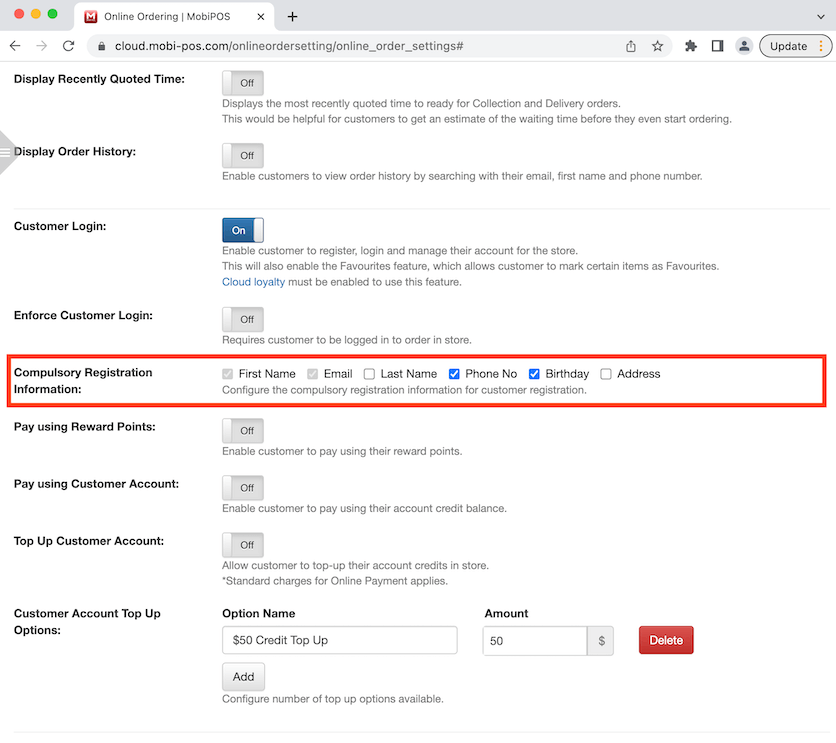
This requires customer to enter the necessary information for registration. You can choose which information is compulsory by ticking on the box.
First Name and Email is ticked by default and all other information is optional. Phone Number and Birthday is ticked as an example. Click Save at the bottom of the page to proceed.
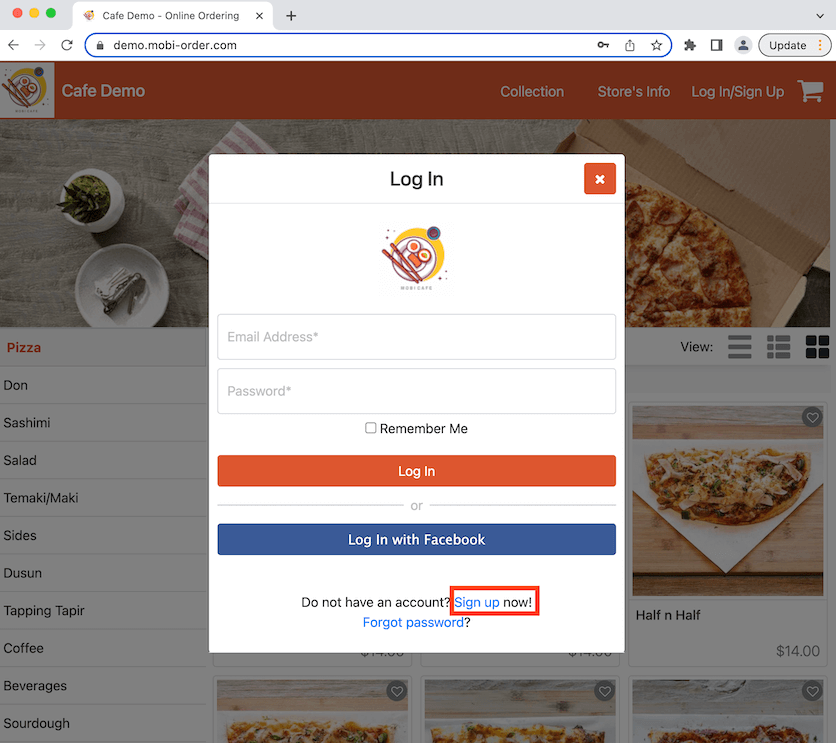
Go to the online store and click on the Log In/Sign Up button on the top right corner. The log in tab will pop up then click on the Sign Up button at the bottom.
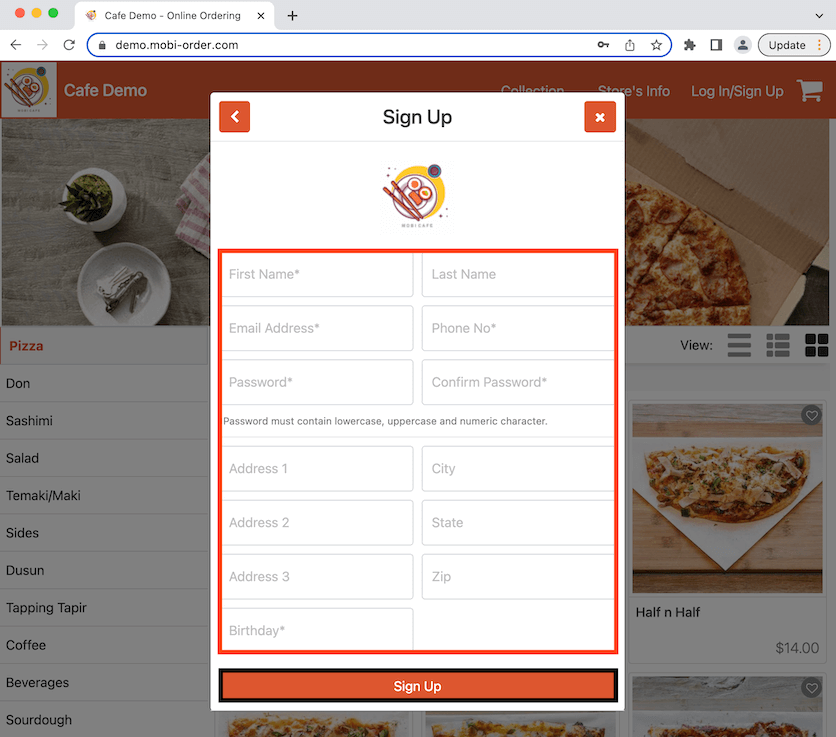
Now it requires the customer to fill in necessary information for registration. The information that is marked with an asterisk means it is compulsory to fill in.
The customer cannot leave this blank. Phone Number and Birthday have been ticked in the previous example photo hence the asterisk is shown here. Fill in all necessary information and click Sign Up.
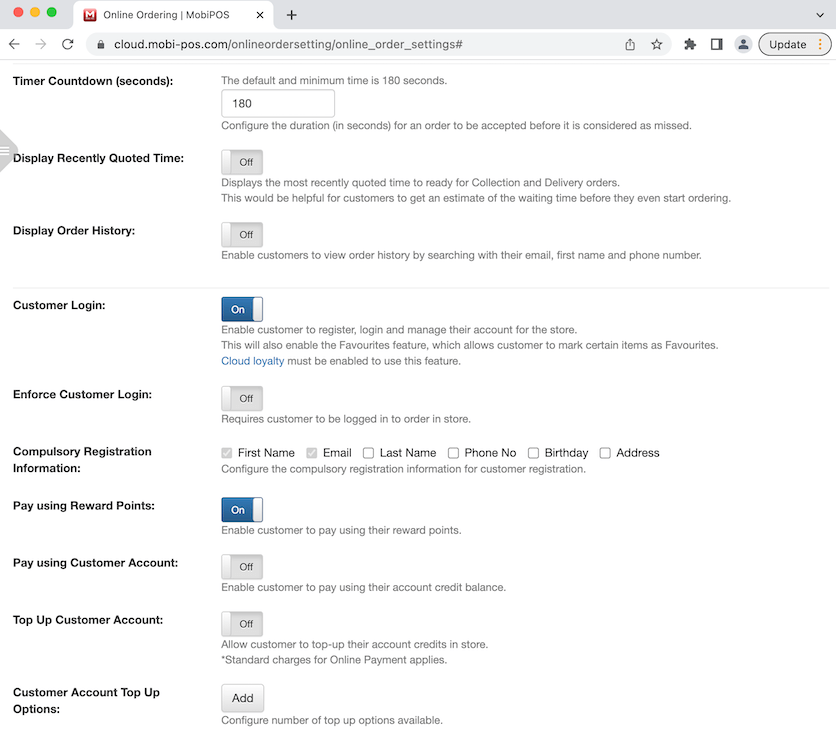
Pay using Reward Points
Toggle this on for customers to pay using their reward points. Click Save at the bottom of the page after.
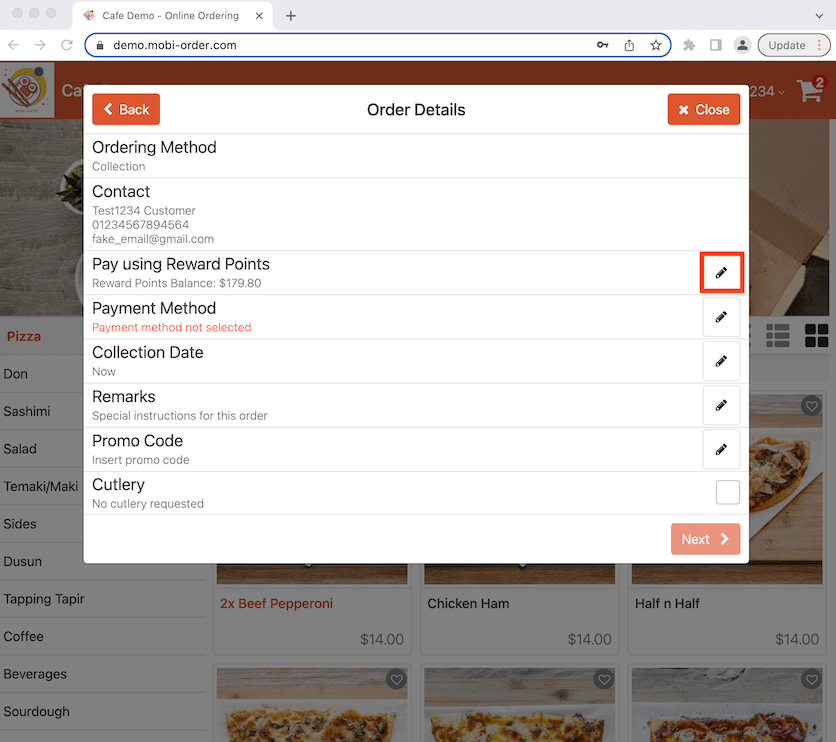
Proceed to order an item on the online store and checkout by clicking on the cart on the top right corner. This will bring the customer to Order Details and there is an option for them to make their payment using reward points.
The Reward Points Balance is also shown here. Click on the pencil icon to select Pay using Reward Points.
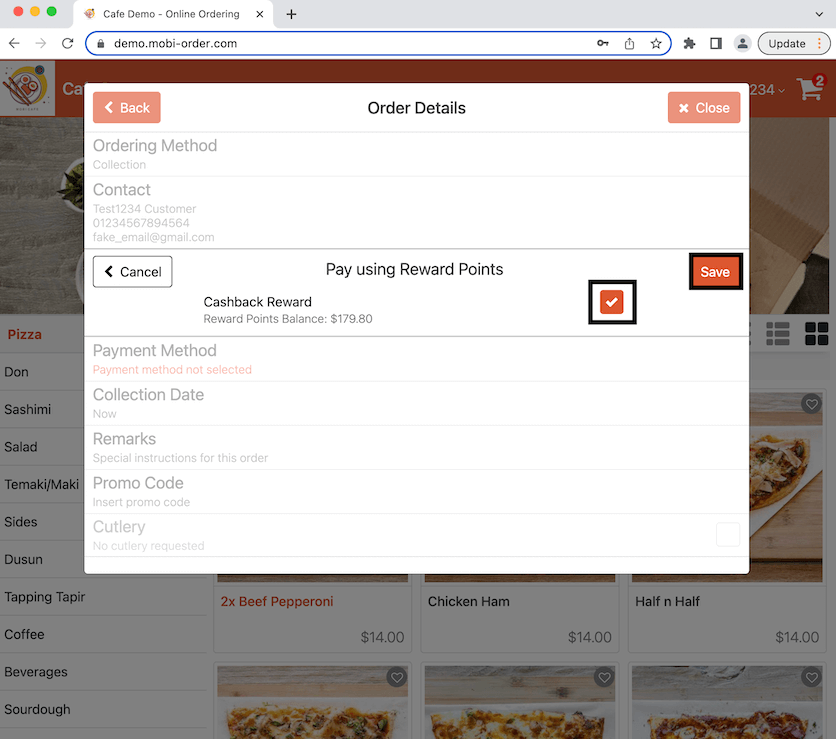
Click to tick Cashback Reward then click Save.
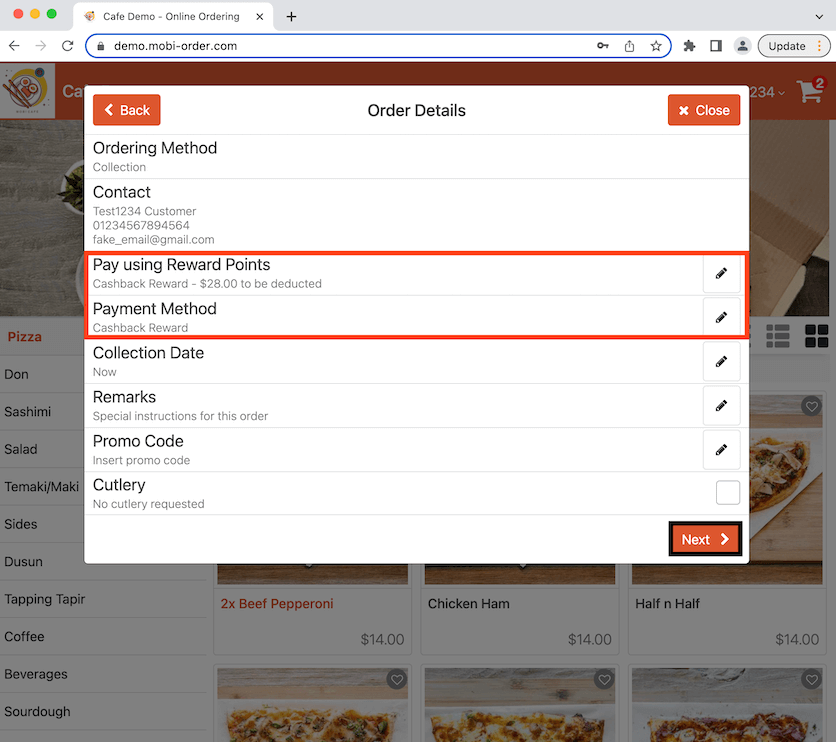
Now it shows how much reward points will be deducted for this order. Cashback Reward has also been linked automatically to Payment Method.
Note that if there are insufficient reward points to make the payment, the remaining amount can only be paid using online payment. If the customer wishes pay with reward points and cash, they can do that in stores when they pay in person.
Click Next to continue.
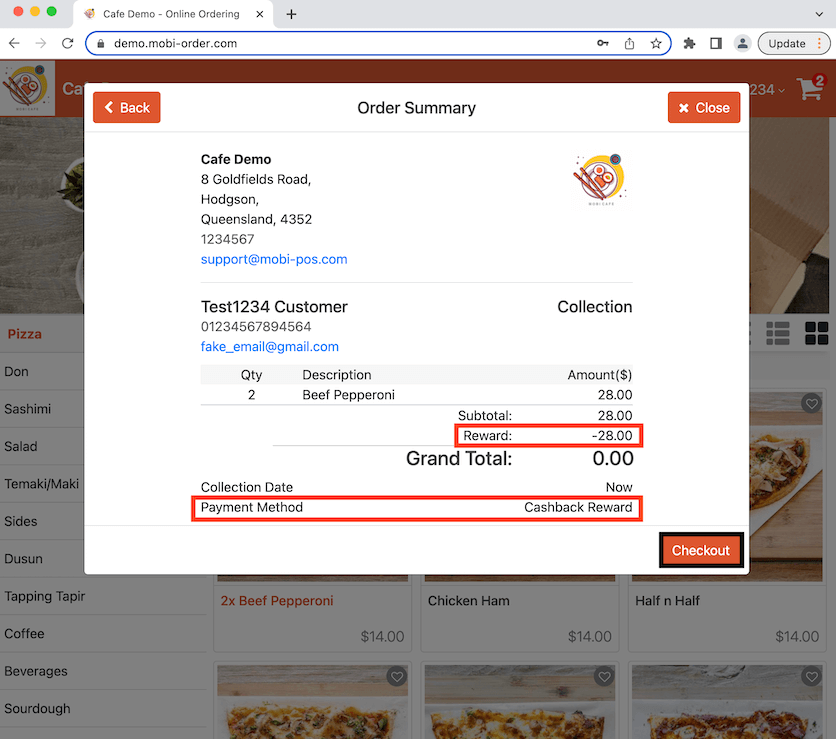
It shows the reward amount that is deducted in the bill alongside with payment method used. Click Checkout to finalise the order.
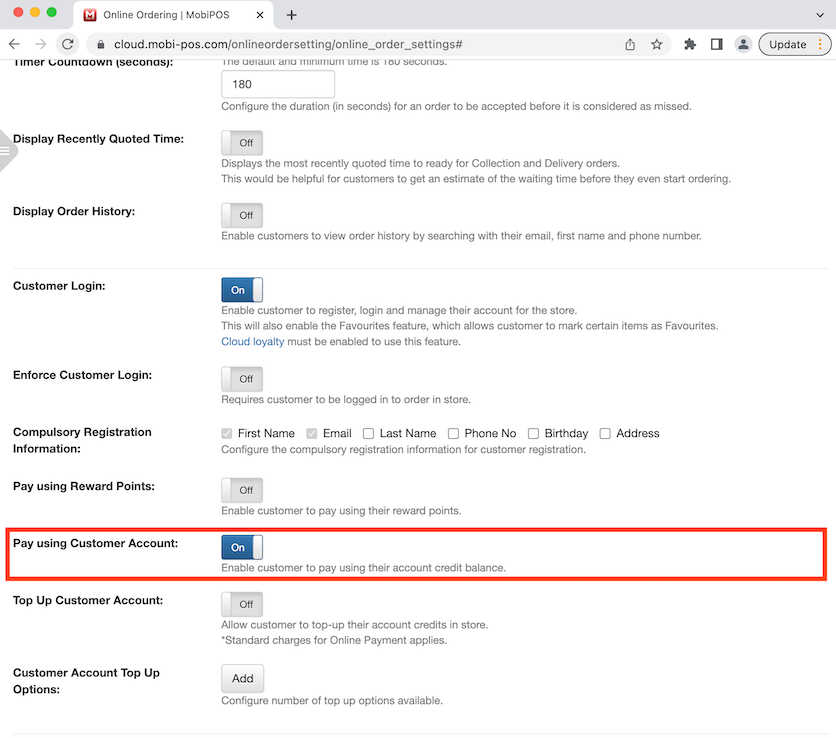
Pay using Customer Account
Toggle this on and it allows customer to pay with their credit balance. Click Save at the bottom of the page after.
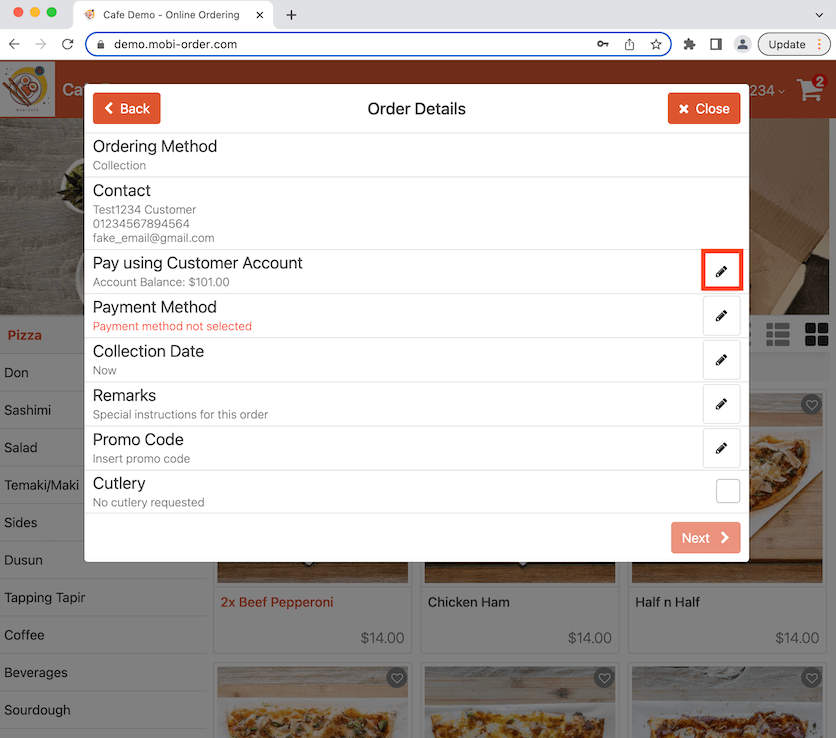
Proceed to order an item on the online store and add it to the cart. Click on the cart and confirm your items. After confirming, it will bring you to Order Details and you have the option to pay using customer account.
It shows the available balance here in the example photo. Click on the pencil icon to select Pay using Customer Account.
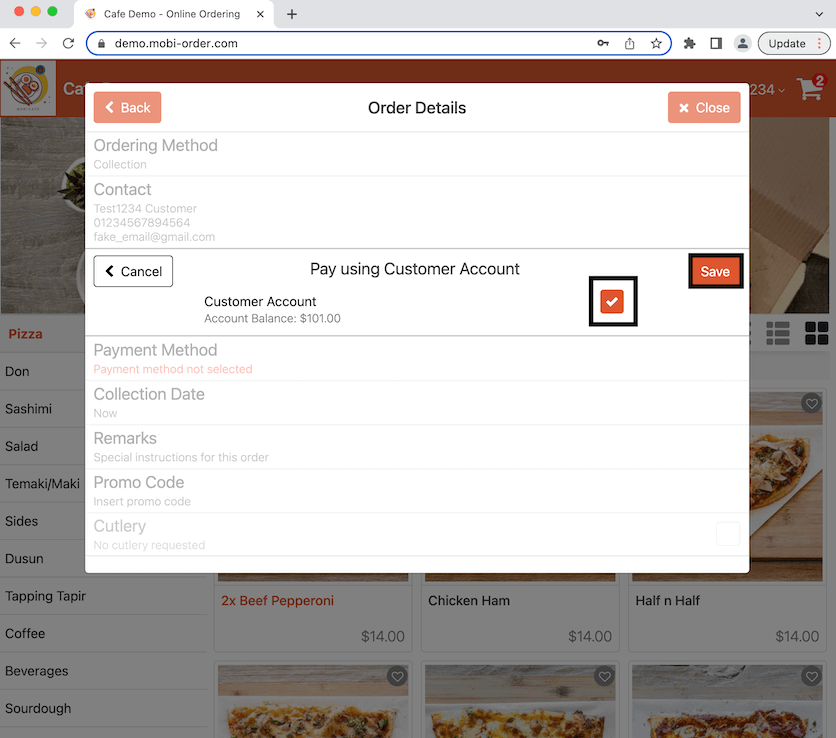
Click to tick the box then click Save.
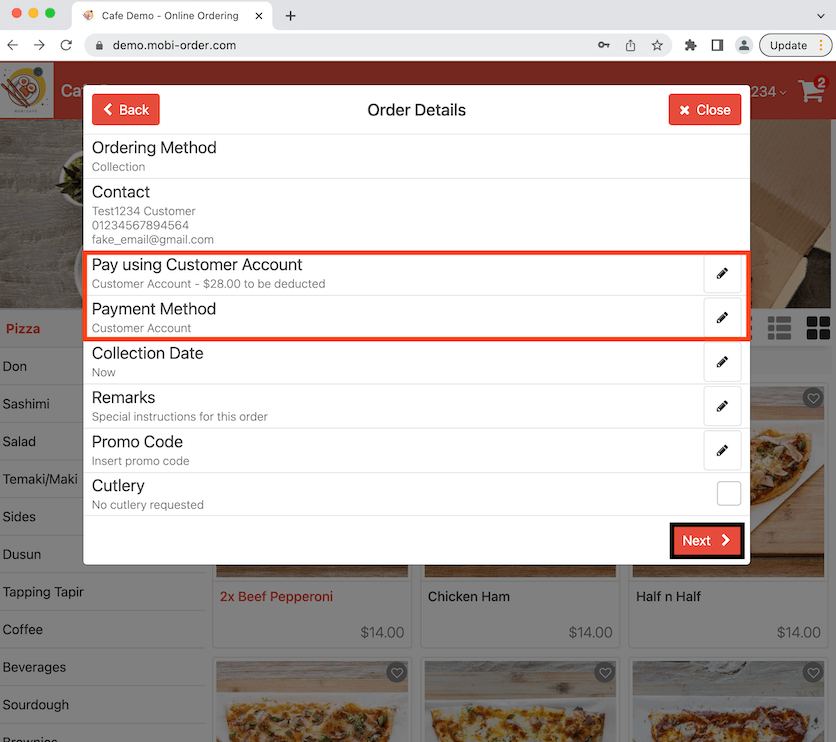
Now it shows how much credit will be deducted from your account. Credit balance has also been linked automatically to Payment Method.
Note that if there is insufficient credit balance to make the payment, the remaining amount can only be paid using online payment. If the customer wishes pay with credit balance and cash, they can do that in stores when they pay in person.
Click Next to continue.
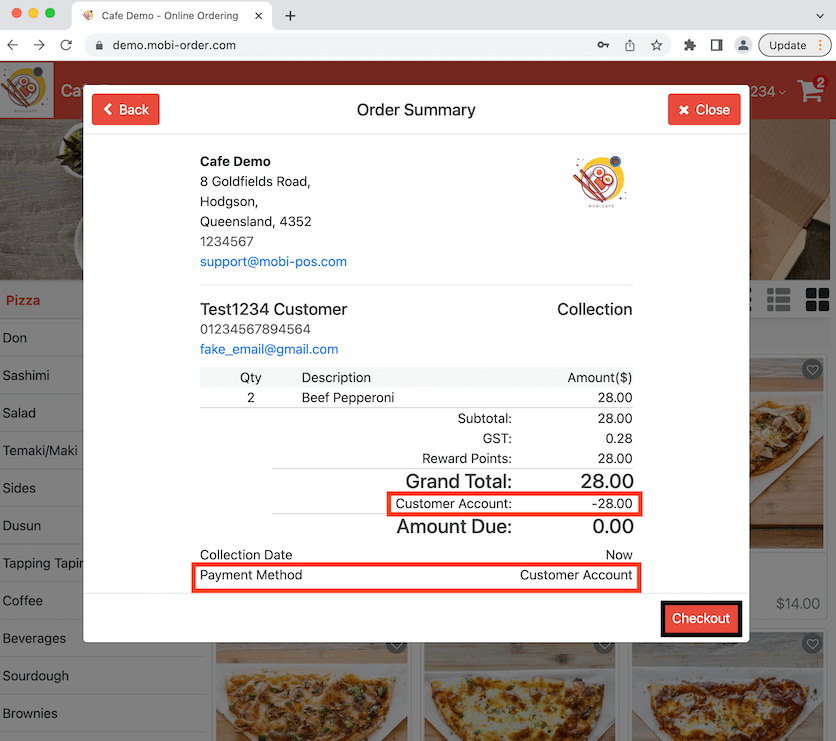
It shows the credit balance that is deducted in the bill alongside with payment method used. Click Checkout to finalise the order.
Top Up Customer Account
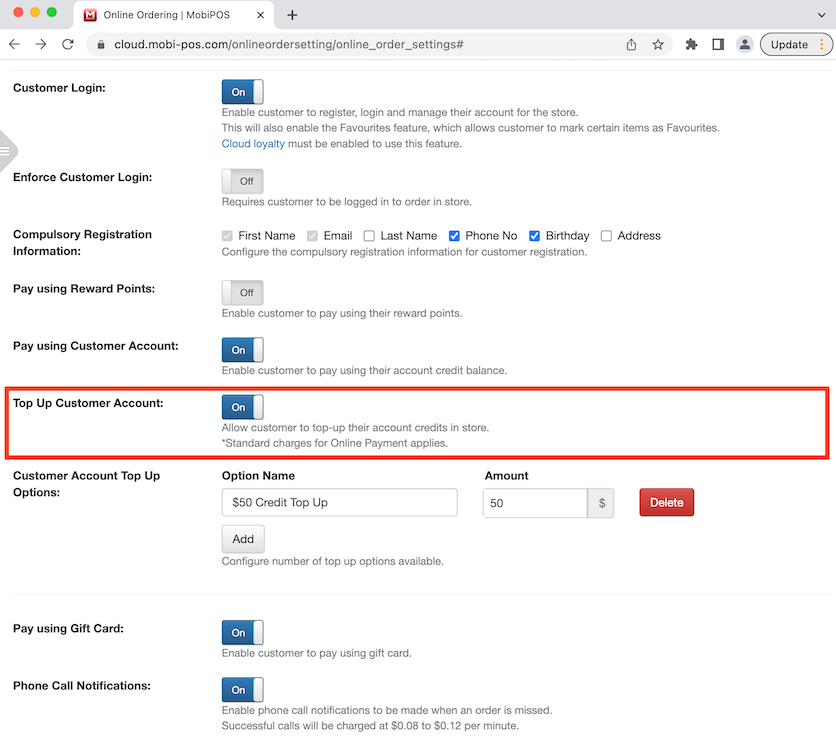
When Pay using Customer Account is enabled, customers have the option of topping up their credit balance to the account.
To do this, click to toggle on Top Up Customer Account then enter the top up name and amount. You can also click on the Add button to add more options. Click Save at the bottom of the page after.
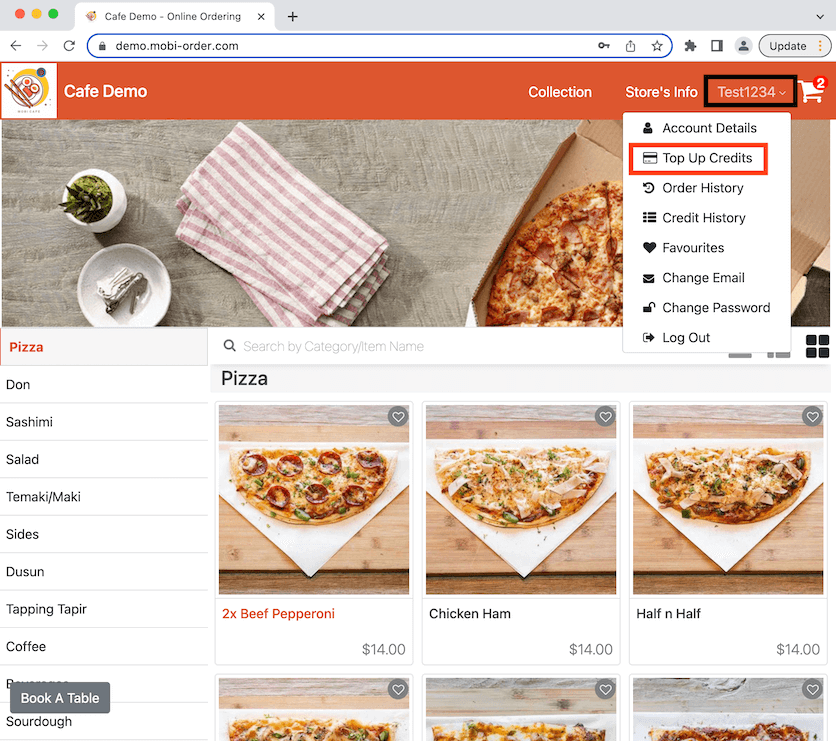
Now go to the online store then log in. Your username will show up after logging in. Click on the username then select Top Up Credits.
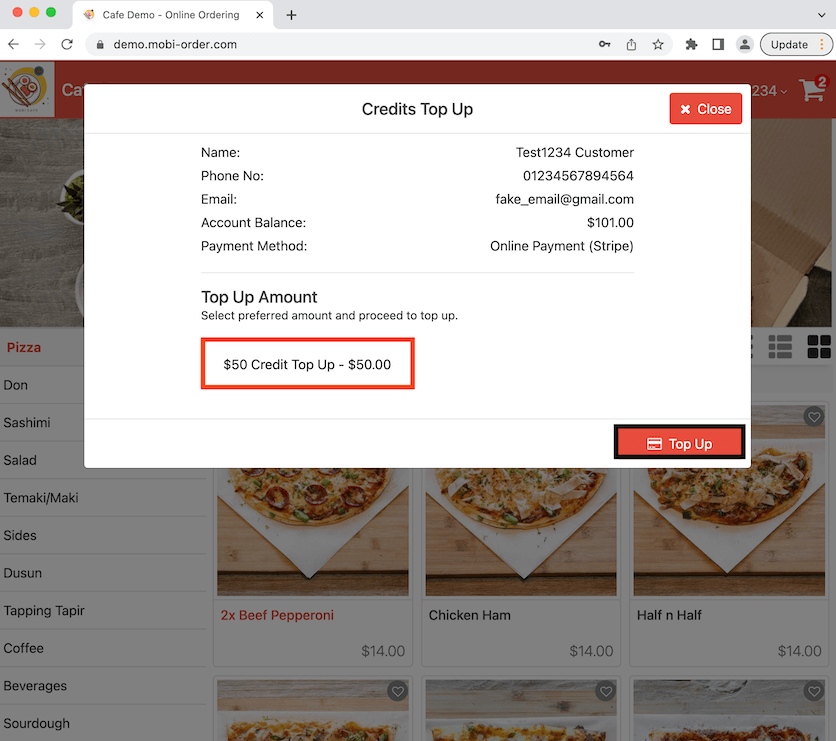
A tab will pop up and it will show the customer's details and the available credit balance. Select the top up amount then click on the Top Up button at the bottom right and it will bring you to the stripe website where you can make your payment.
Pay using Gift Card
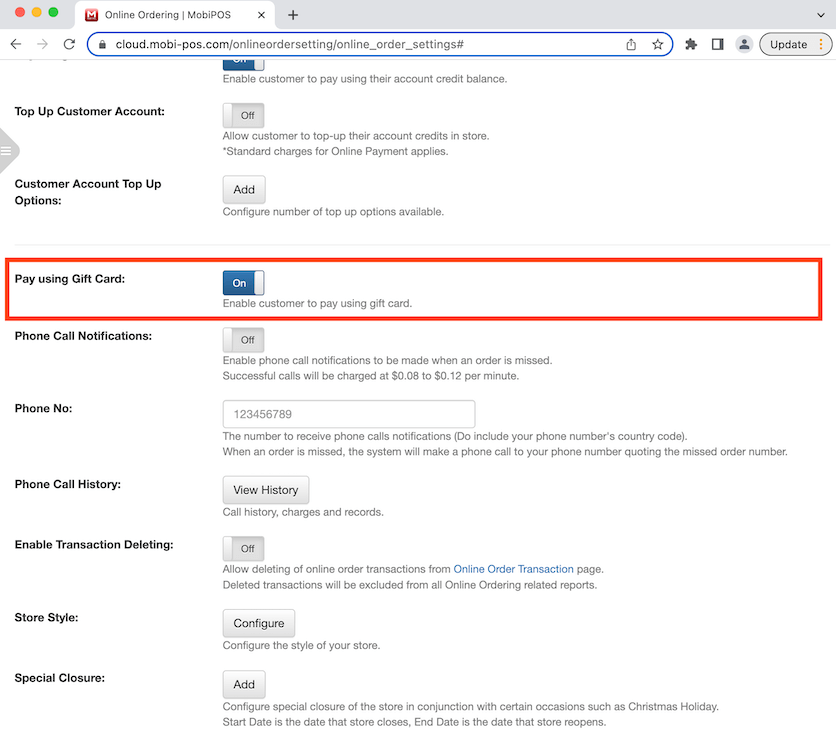
Enabling this allows customer the option to pay with gift card. The gift card can be used by any customer. Click to toggle on then click Save at the bottom of the page after.
Go to the online store and order an item. Click on the Cart to proceed with payment. It will bring you to Order Details where you have the option to pay using gift card. Click on the pencil icon to continue.
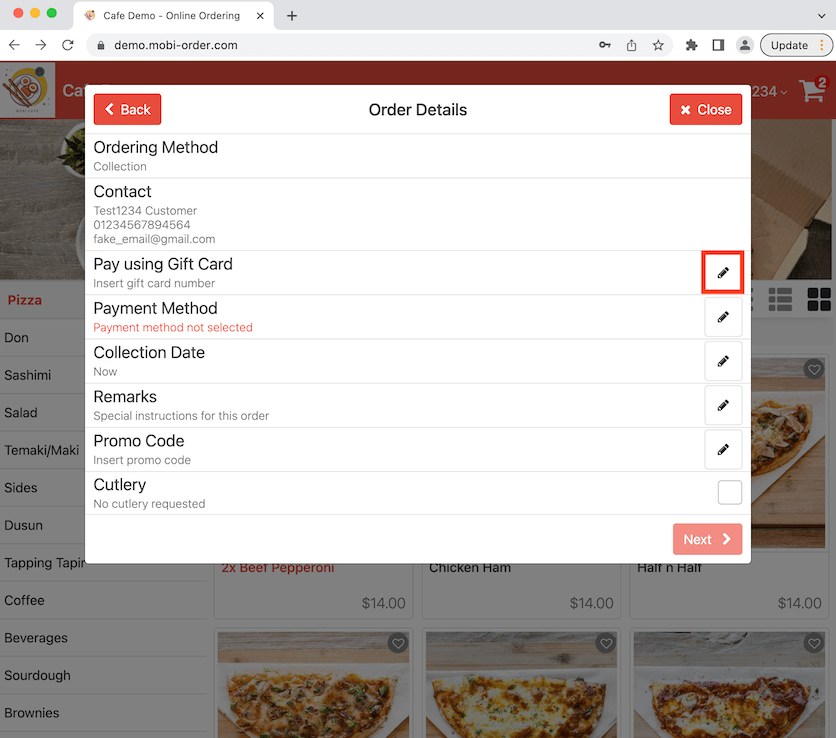
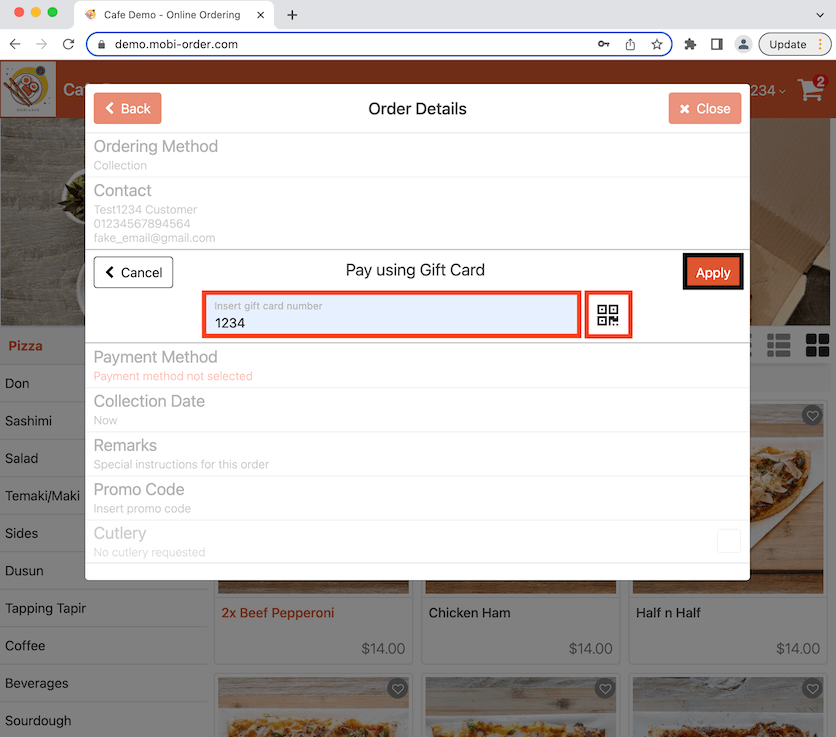
Enter the gift card number then click on the Apply button.
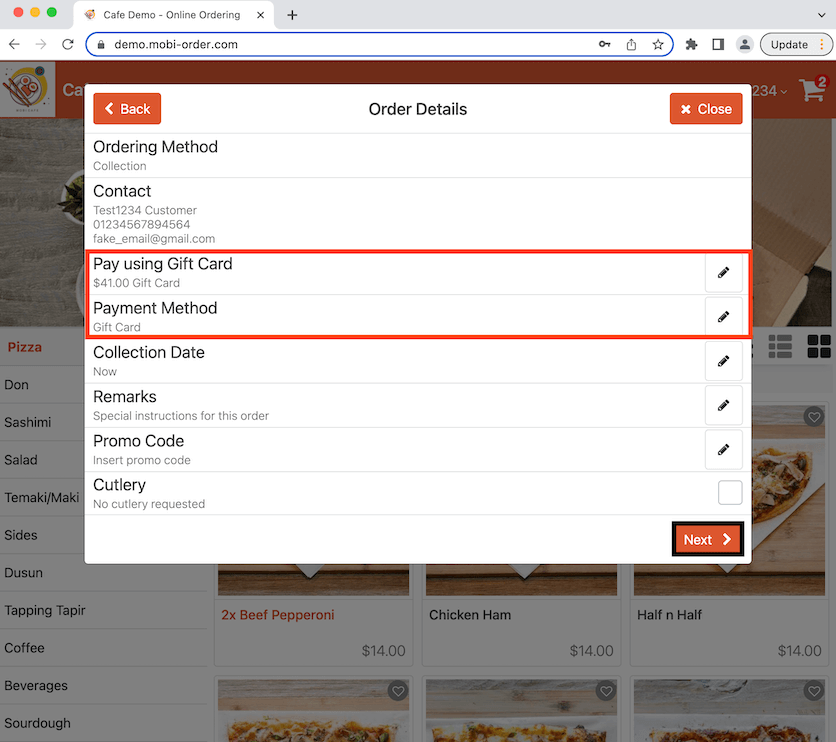
Now it shows the gift card has been applied under Pay using Gift Card. The remaining balance for the gift card is also shown here. Gift card has also been linked automatically to Payment Method.
Note that if there is insufficient gift card balance to make the payment, the remaining amount can only be paid using online payment. If the customer wishes pay with gift card and cash, they can do that in stores when they pay in person.
Click Next to continue.
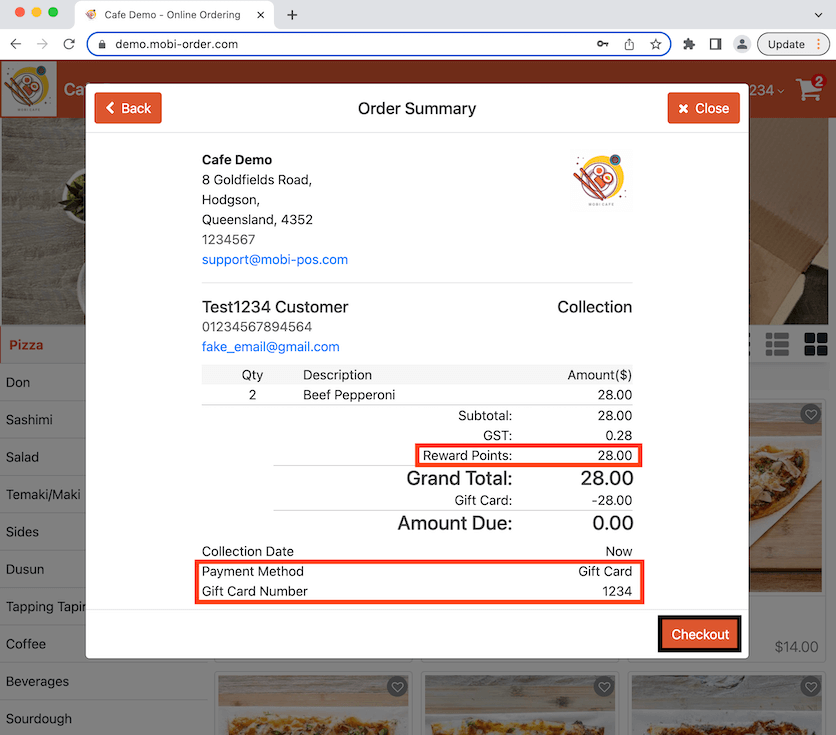
It shows here the amount deducted from the gift card and the payment method used in this bill. Click Checkout to finalise payment.
Phone Call Notifications
Enabling this will allow phone calls notifications to be made directly to your number to inform about a missed order. Successful phone calls will be charged at $0.08 to $0.12 per minute.
Phone Number
Insert your phone number to allow phone call notifications for any missed orders.
Phone Call History
By clicking on View History, it will bring you to a new tab where the phone call history is shown based on the online order ID.
Enabled Transaction Deleting
Enabling this allows online order transactions to be deleted from the online order transaction page without it affecting the POS configuration. Click on the Online Order Transaction link and it will bring you to a new tab.
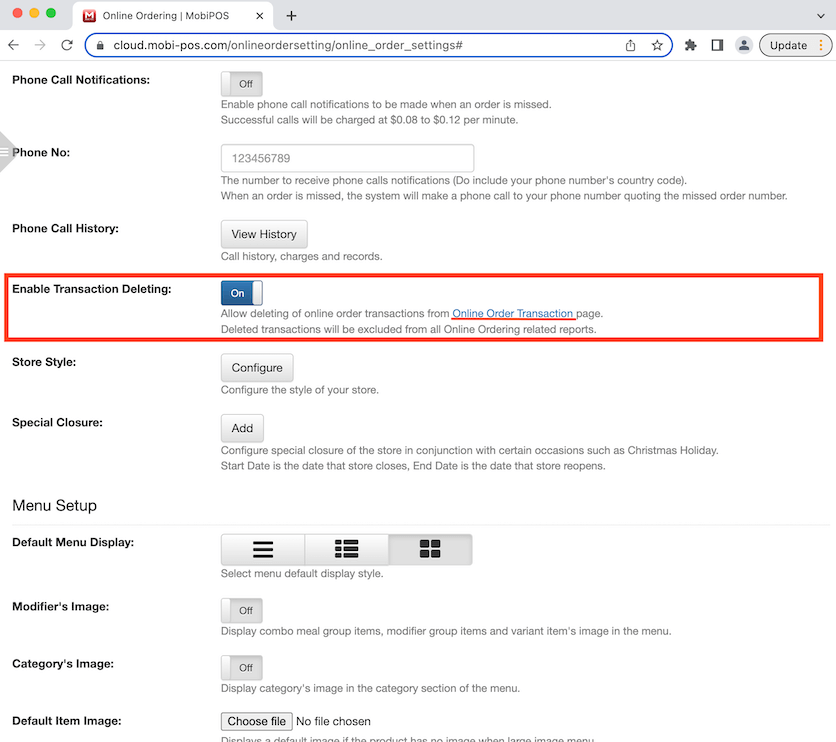
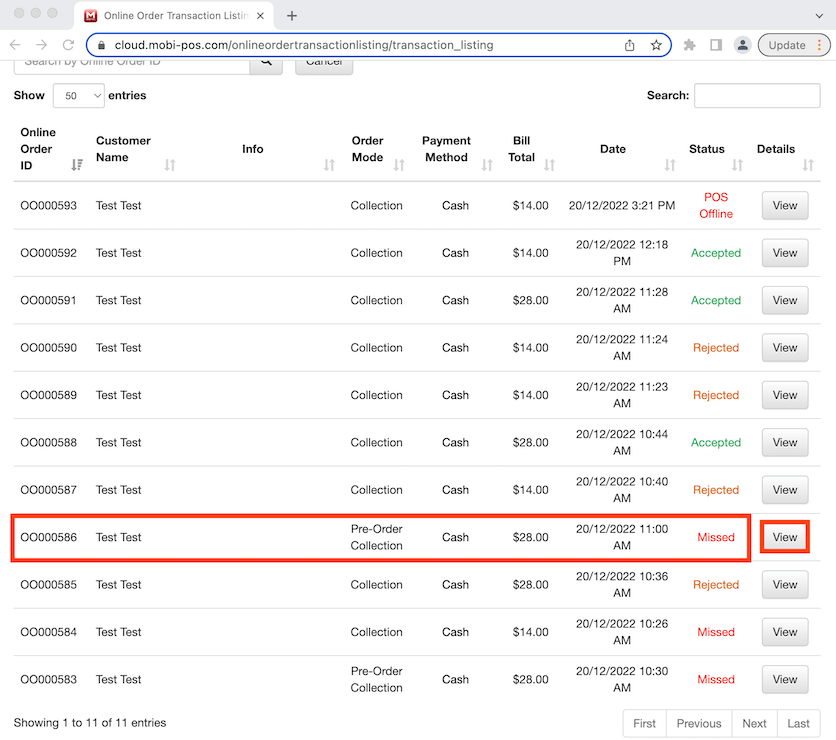
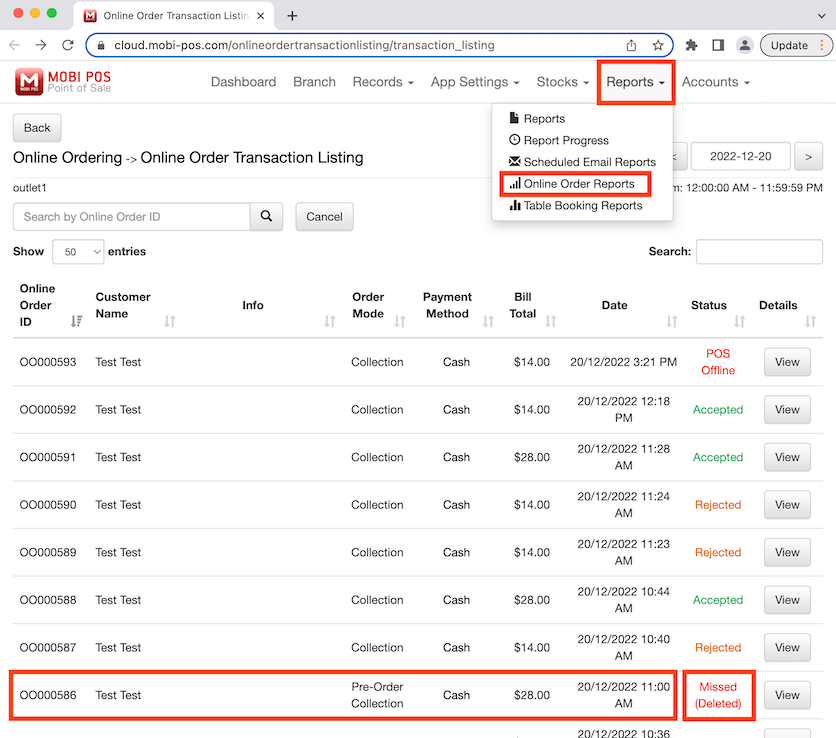
It shows all the online transaction for this date and we will delete the transaction highlighted as an example. Click on the View button to access the transaction.
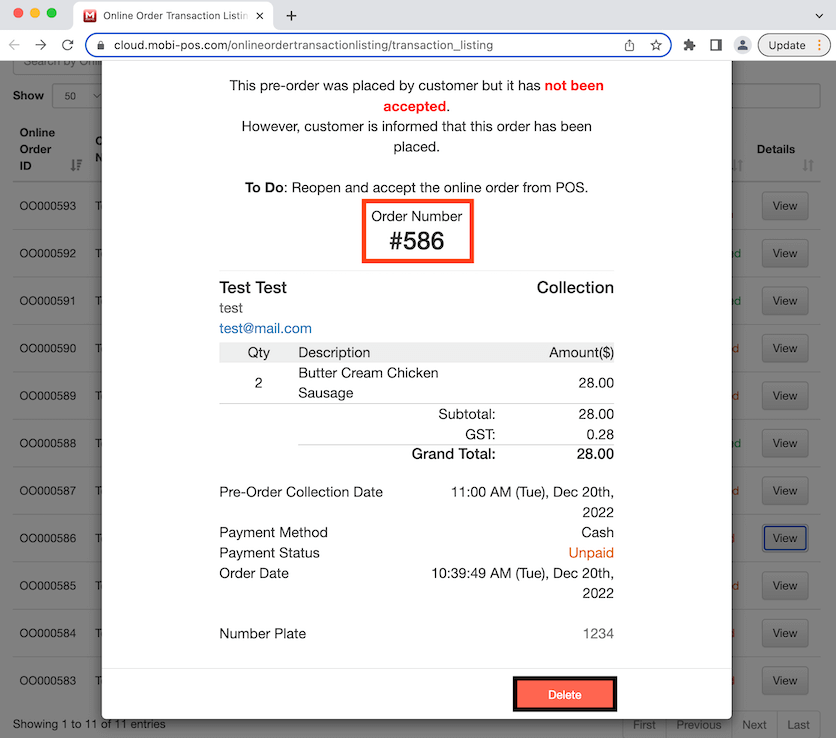
The order number is #586 and we want to delete this transaction. Click on the Delete button below.
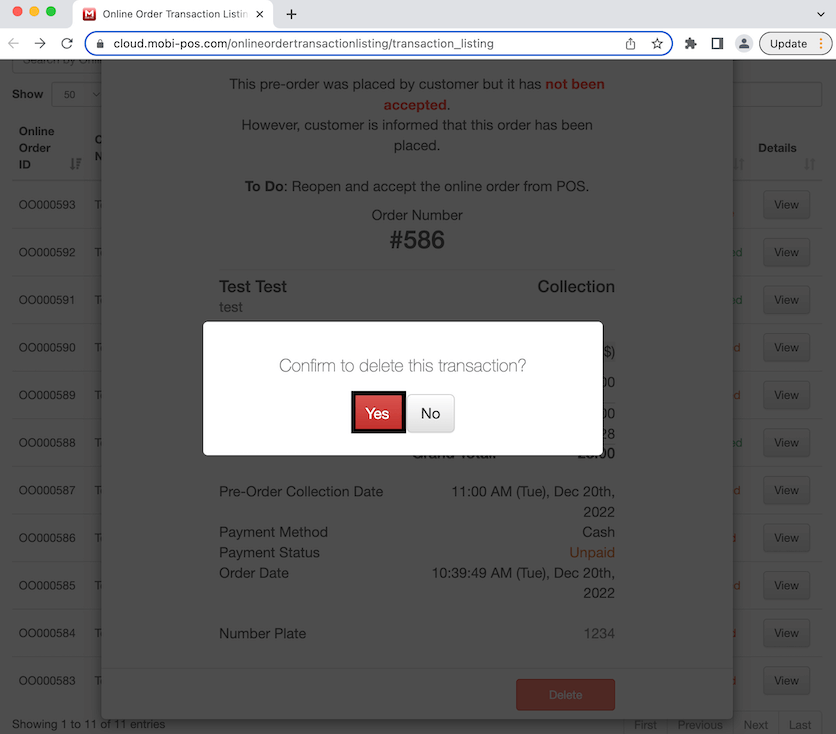
Click Yes to confirm.
Now it shows here on the transaction listing that order #586 has been deleted. However, this transaction will not appear in Online Order Reports at all. To view, click on Reports at the top of the page then select Online Order Reports.
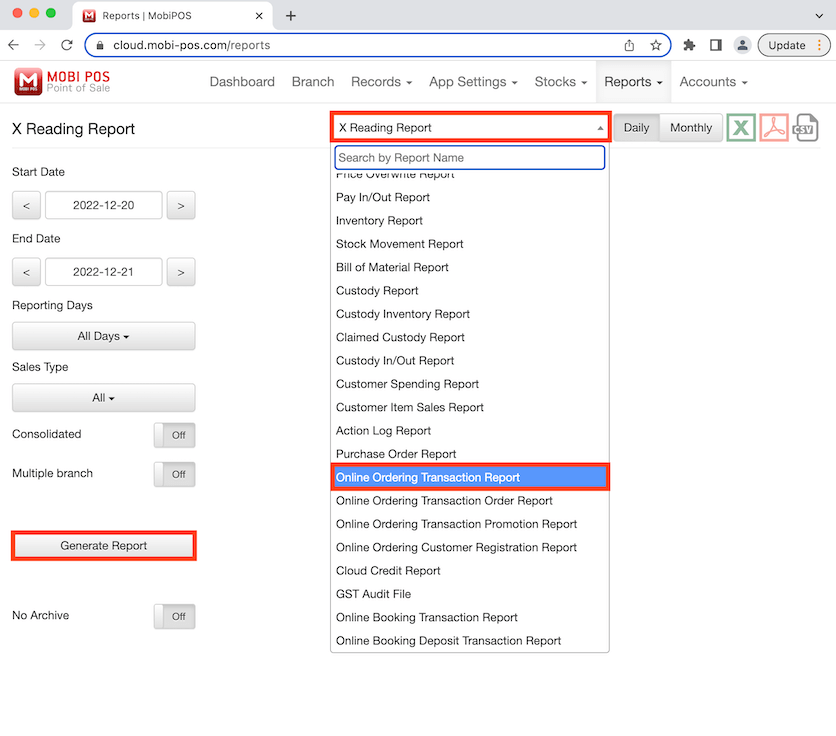
Click to Generate Report. Click on X reading report to then select Online Ordering Transaction Report will show up on the right.
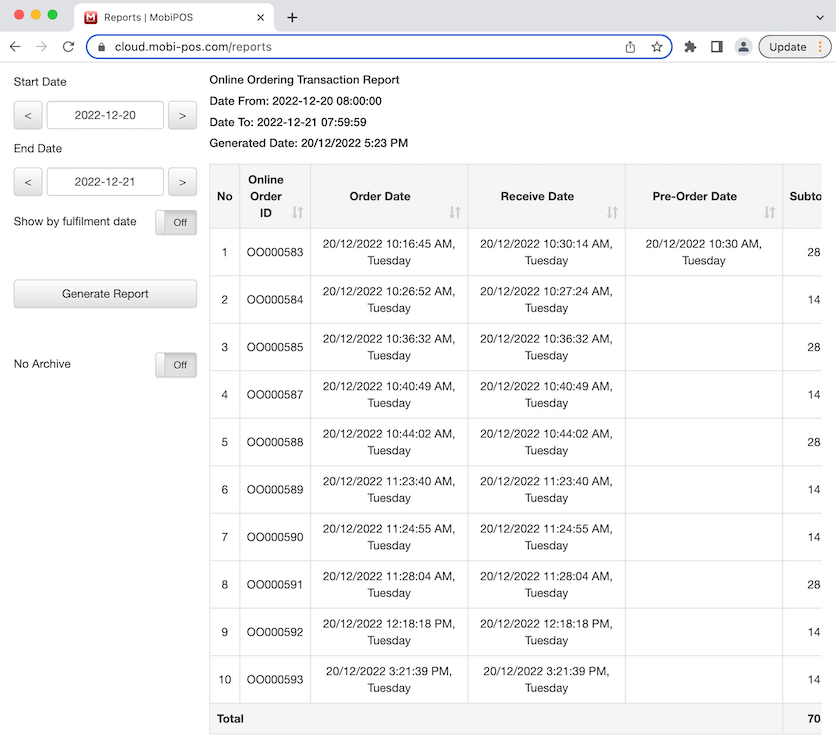
These are all the transactions for this date and order #586 does not show up here since it has been deleted.
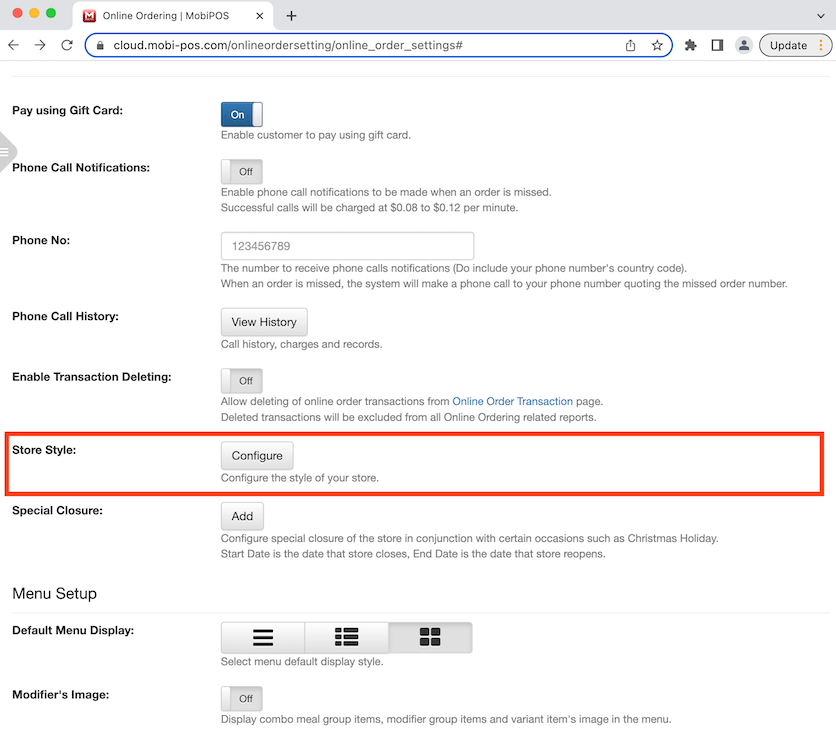
Store Style
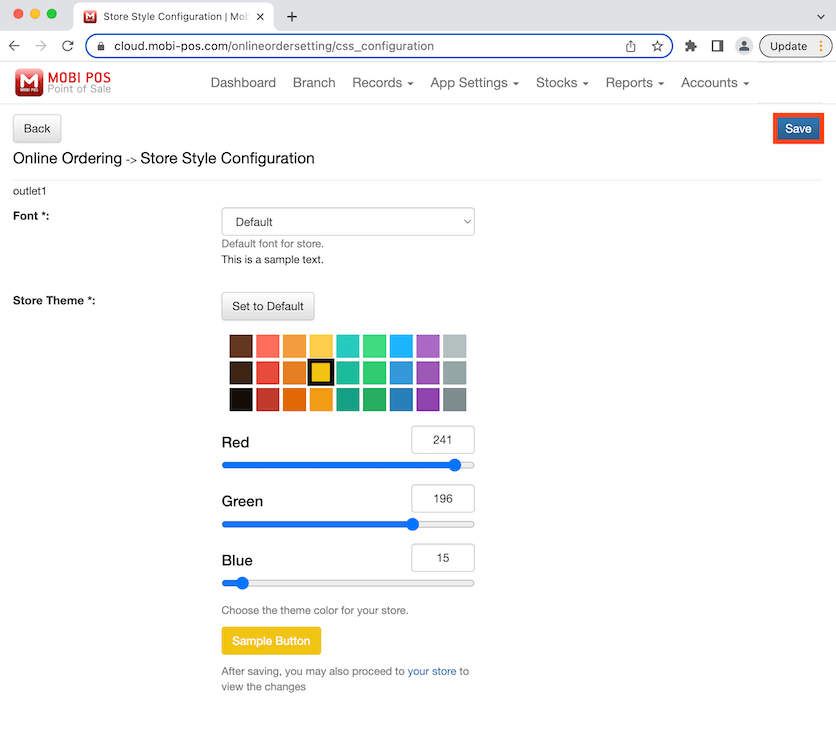
By clicking on Configure, this allows you to change the colour and style of the online store. Click on the Configure button and it will bring you to a new tab.
Select the colour you want and the colour of the sample button will change accordingly to your preference. After selecting a colour, click on the Save button on the top right corner of the page then click on the your store link.
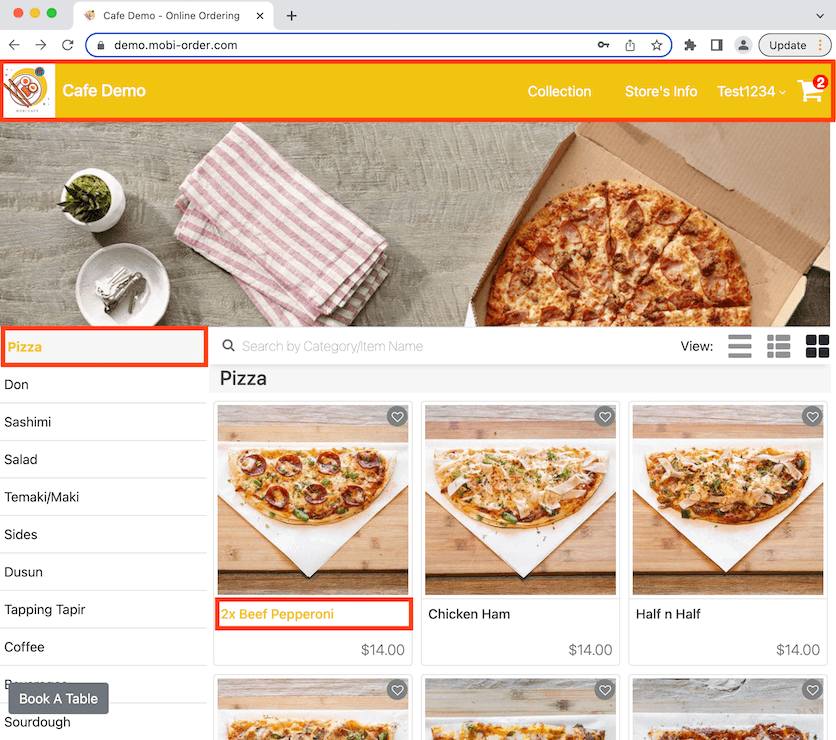
The link will bring you to the online store where you can view the colour changes. The highlighted parts of the photo are where the colour changes will be effective which includes the colour of the header, selected category and item.
Special Closure
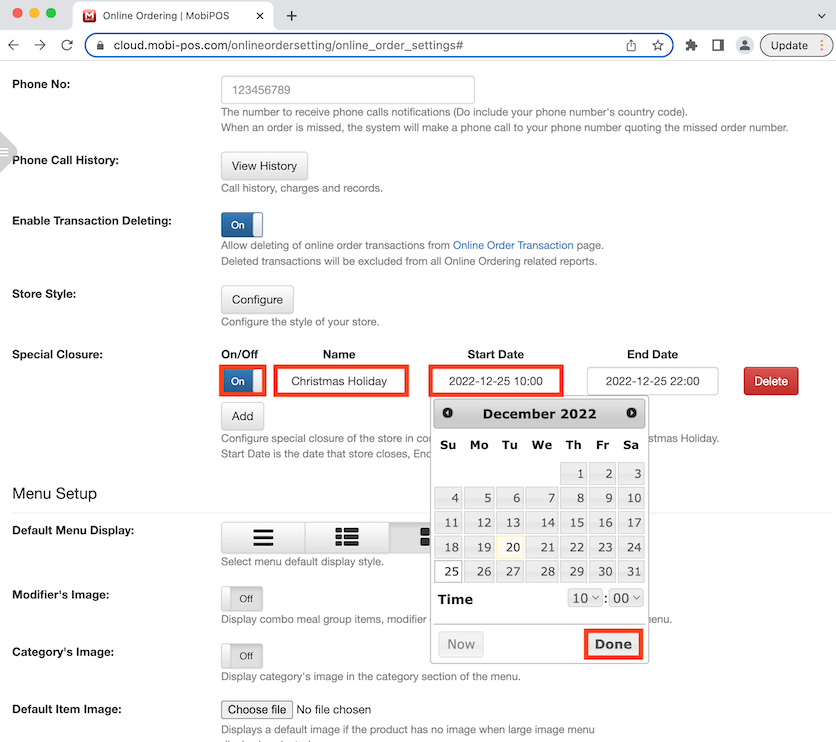
Special closure allows you to display a date and time on the online store to inform customers about the closure of the business, especially on Public Holidays or on certain occasions.
Click to toggle on and enter the name of the occasion. Click on Start Date then select the time and date for the store closure. Do the same for End Date. Click Save at the bottom of the page to finalise.
Now go to the online store and click on Store's Info.
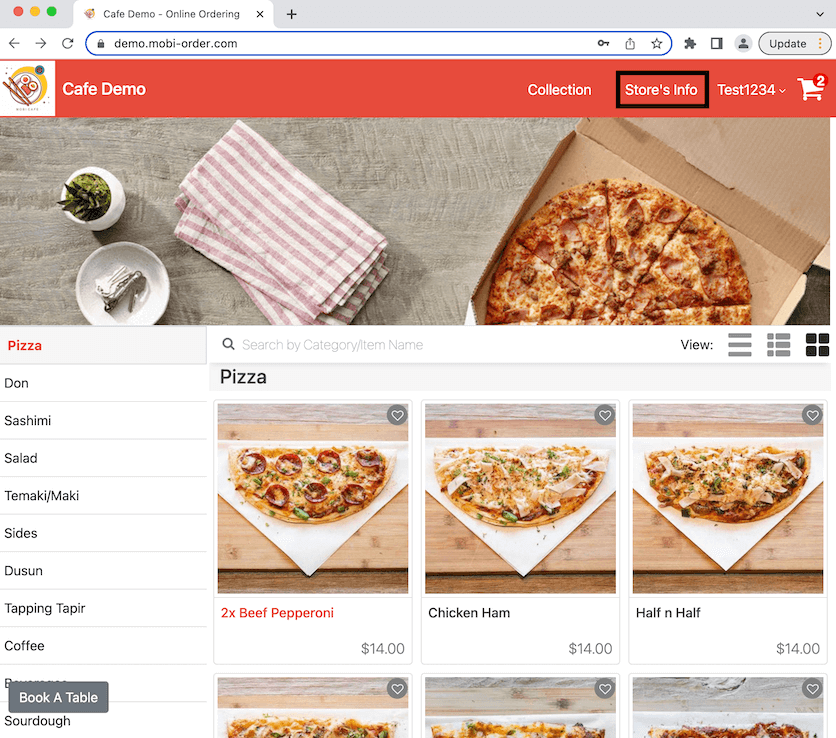
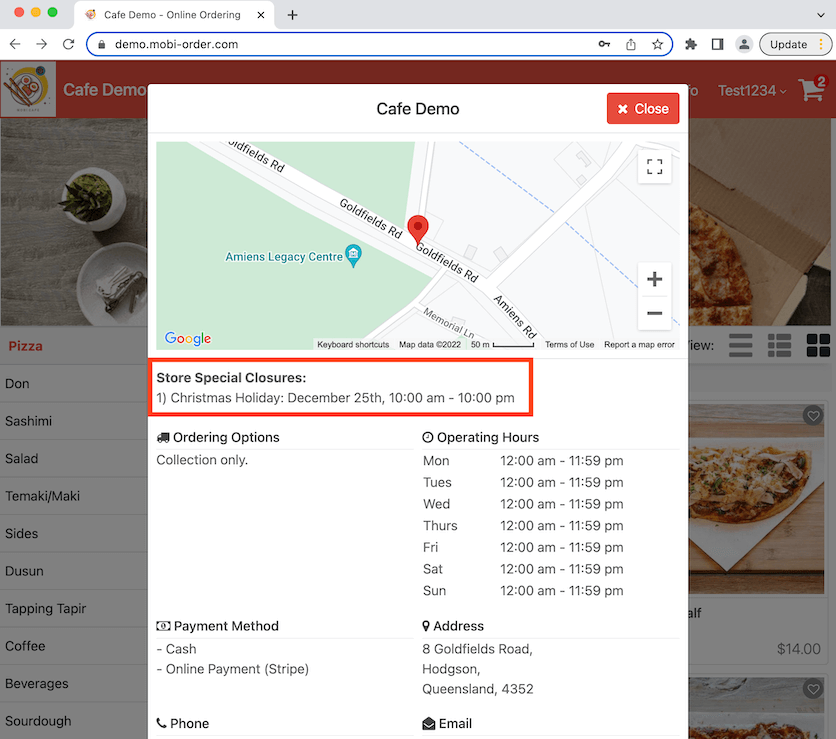
It shows the occasion, date and time for the store closure for Christmas Holiday.
